

"apply patterns" 라는 플러그인을 활용하면 find and replace(찾아바꾸기) 하고 싶은 패턴을 저장해 놓고 -> command 명령어로 만들어서 -> 단축키를 설정할수 있다.
특정 찾아바꾸기를 계속 해야하는 상황이라면 아주 유용하게 쓸수 있는 기능이다.
나같은 경우에 omnivore를 통해 글을 스크랩했을때 `&` ``` 같은 html entities 들이 문제가 생겨서 한번에 찾아 바꾸기 위해서 사용하고 있다.
html enities은 아래 문서를 참고하면 된다
https://www.w3schools.com/charsets/ref_html_entities_4.asp
W3Schools.com
W3Schools offers free online tutorials, references and exercises in all the major languages of the web. Covering popular subjects like HTML, CSS, JavaScript, Python, SQL, Java, and many, many more.
www.w3schools.com
https://www.freeformatter.com/html-entities.html
Complete list of HTML entities - FreeFormatter.com
ISO 8859-1 Characters Full list of supported ISO-8859-1 characters. Notice that the names are case sensitive, hence if you want an uppercase letter, the name should also start with an uppercase letter. Character Entity Name Entity Number Description Spa
www.freeformatter.com
"Apply Patterns" 플러그인 설정은 좀 복잡하게 되어있는데 크게 두 부분으로 나뉘어져 있다고 보면된다
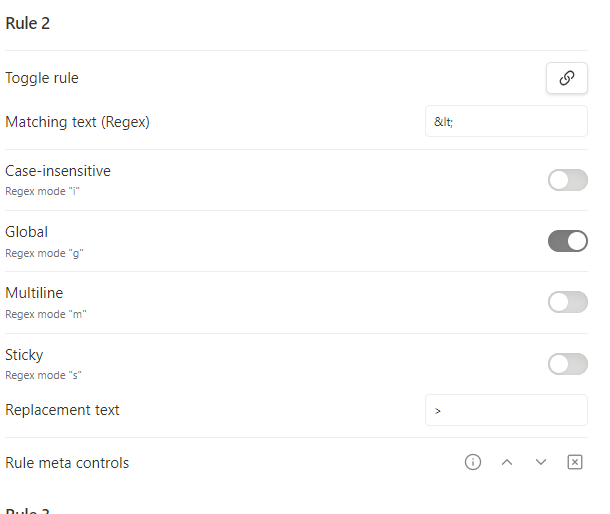
첫번째 파트는 내가 찾아바꾸기 하고 싶은 pattern과 rule을 등록하는 부분이다.

pattern1 안에서 여러개의 찾아바꾸기 Rule을 만드는 것이다
"add pattern" 버튼을 누르면 pattern이 생성되고 "add find/ replace rule" 버튼을 누르면 pattern 안에서 rule 이 생성된다.
한개의 pattern 안에 여러개의 rule 을 만들수 있다.
일단 pattern name 에 원하는 이름을 붙여주고

"add find/ replace rule" 이런식으로 자기가 찾아바꾸기 하고싶은 룰들을 집어넣는다

두번째 파트는 pattern 을 command 명령어로 만드는 부분이다

"add command"버튼을 눌러서 명령어를 만드는데
command palette name과 pattern name filter 부분 위에서 지정한 이름을 넣어준다
선택한 부분에만 적용할지 (apply to selection), 해당 글 전체에 적용할지 (apply to whole lines), 전체 문서에 적용할지 (apply to whole document) 등을 선택하면 된다. 나 같은 경우에는 apply to whole lines만 켜놓고 사용한다

"apply patterns" 플러그인에서 할 설정은 끝났고, 전체 설정 중 hotkeys 단축키 부분에 가서 단축키를 설정해주면 된다.
일단 옵시디언을 한번 껐다가 키고 설정 > Hotkeys 단축키 부분에 가서 내가 설정한 이름(여기서는'HTML ENTITIES')을 검색한뒤 단축키를 등록해주면 된다. 나같은 경우에는 `ctrl alt 1` 을 설정해 두고 사용하고 있다.

위쪽에서는 apply patterns 플러그인을 어떻게 사용하는지 설명한 것이고
내가 겪었던 html entities 문제를 해결하고자 한다면 아래를 따라가면된다.
1. apply patterns 플러그인 설치
2. apply patterns 플러그인의 setting 들어가기
3. 아래 코드를 복사한 뒤 "import pattern from clipboard"부분 import 버튼 누르기
[
  {
    "name": "HTML ENTITIES",
    "rules": [
      {
        "from": ">",
        "to": ">",
        "caseInsensitive": false,
        "global": true,
        "multiline": false,
        "sticky": false,
        "disabled": false
      },
      {
        "from": "<",
        "to": ">",
        "caseInsensitive": false,
        "global": true,
        "multiline": false,
        "sticky": false,
        "disabled": false
      },
      {
        "from": "/",
        "to": "/",
        "caseInsensitive": false,
        "global": true,
        "multiline": false,
        "sticky": false,
        "disabled": false
      },
      {
        "from": "'",
        "to": "'",
        "caseInsensitive": false,
        "global": true,
        "multiline": false,
        "sticky": false,
        "disabled": false
      },
      {
        "from": """,
        "to": "\"",
        "caseInsensitive": false,
        "global": true,
        "multiline": false,
        "sticky": false,
        "disabled": false
      },
      {
        "from": "=",
        "to": "=",
        "caseInsensitive": false,
        "global": true,
        "multiline": false,
        "sticky": false,
        "disabled": false
      },
      {
        "from": """,
        "to": "\"",
        "caseInsensitive": false,
        "global": true,
        "multiline": false,
        "sticky": false,
        "disabled": false
      },
      {
        "from": "&",
        "to": "&",
        "caseInsensitive": false,
        "global": true,
        "multiline": false,
        "sticky": false,
        "disabled": false
      },
      {
        "from": "`",
        "to": "`",
        "caseInsensitive": false,
        "global": true,
        "multiline": false,
        "sticky": false,
        "disabled": false
      }
    ],
    "collapsed": false,
    "cursorRegexStart": "$",
    "cursorRegexEnd": "^"
  }

]
4. 아래 코드를 복사한 뒤 "import commands from clipboard"부분 import 버튼 누르기
[
  {
    "name": "HTML ENTITIES",
    "icon": "search",
    "patternFilter": "HTML ENTITIES",
    "selection": false,
    "lines": true,
    "document": false,
    "clipboard": false,
    "clipboardLines": false
  }
]
5. 전체 설정 > hotkey 단축 키 부분 들어가서 > "HTML ENTITES" 검색하기 > 원하는 단축키 설정하기 ( 나 같은 경우 ctrl alt 1 으로 사용하고 있음)
6. 추가적으로 html entities 찾아바꾸기 룰을 만들고 싶으면 "add find/replace rule" 버튼을 통해 추가할수 있음

'Obsidian' 카테고리의 다른 글
| 옴니보어 스크랩 후 → 옵시디언에서 자료 정리하기 (Folder Note와 dataview 활용) (0) | 2024.05.07 |
|---|---|
| 옵시디언 특정 페이지만 헤더 색상 변경하기 + 헤더 단축키 설정하기 (2) | 2024.04.30 |
| 옵시디언 편집화면/읽기화면, 소스모드/라이브 미리보기 차이 Editing view/Reading view, Source mode/Live Preview (1) | 2024.04.28 |
| 옵시디언 css 스니펫 사용방법 - obsidian css snippet (1) | 2024.04.28 |
| 옵시디언 초기세팅2: 왕기초 플러그인 설치, 헤더 크기 변경 (0) | 2024.04.25 |